Physical Address
304 North Cardinal St.
Dorchester Center, MA 02124
Physical Address
304 North Cardinal St.
Dorchester Center, MA 02124


Unlike conventional hosted PBX systems, open-source IP PBXs like FreePBX provide more scalability, decreased expenses, and customization options.
The FreePBX Ecosystem creates robust communication solutions that are simple to maintain and execute.
IP PBX is software-based rather than hardware-based. Allows for an infinite number of extensions per user and it uses a single network for the transmission of voice, video, data, and other types of information.
Let’s start with How to Install FreePBX on Ubuntu 22.04 / 23.04.
Importantly, FreePBX is an open-source IP PBX administration tool developed by Sangoma Technologies. It provides customers with a wide variety of options for tailoring their corporate phone system, both in terms of pre-installed functionality and additional modules.
It has certain standard functions already implemented, but its main appeal is that it is customizable to meet your business’s precise requirements.
In this section, firstly we show the Asterisk installation. After that, we guide you on how to install FreePBX on Ubuntu 22.04 / 23.04.
Before starting, update all the system packages to the updated version. Update all of them using the following command.
apt update -y
apt upgrade -y
Once all the packages are upgraded, you must install some dependencies required for Asterisk. Install all those dependencies using the following command.
apt-get install unzip git gnupg2 curl libedit-dev libnewt-dev libssl-dev libncurses5-dev subversion libsqlite3-dev build-essential libjansson-dev libxml2-dev uuid-dev subversion -yOnce all the dependencies are installed, proceed to the next step.
By default, the Asterisk package is not included in the Ubuntu default repository. So compile it from the source. First, download the latest version of Asterisk using the following command.
wget https://downloads.asterisk.org/pub/telephony/asterisk/asterisk-18-current.tar.gzOnce the Asterisk is downloaded, extract the downloaded file with the following command.
tar -xvzf asterisk-18-current.tar.gzNext, navigate inside the Asterisk directory.
Use the following commands.
cd asterisk-18*/
contrib/scripts/get_mp3_source.sh
contrib/scripts/install_prereq install
Next, configure the Asterisk server with the following command.
./configureOnce the asterisk is configured, you get the following screen.

Next, run the following command to install additional modules.
make menuselectYou should see the addon selection screen.
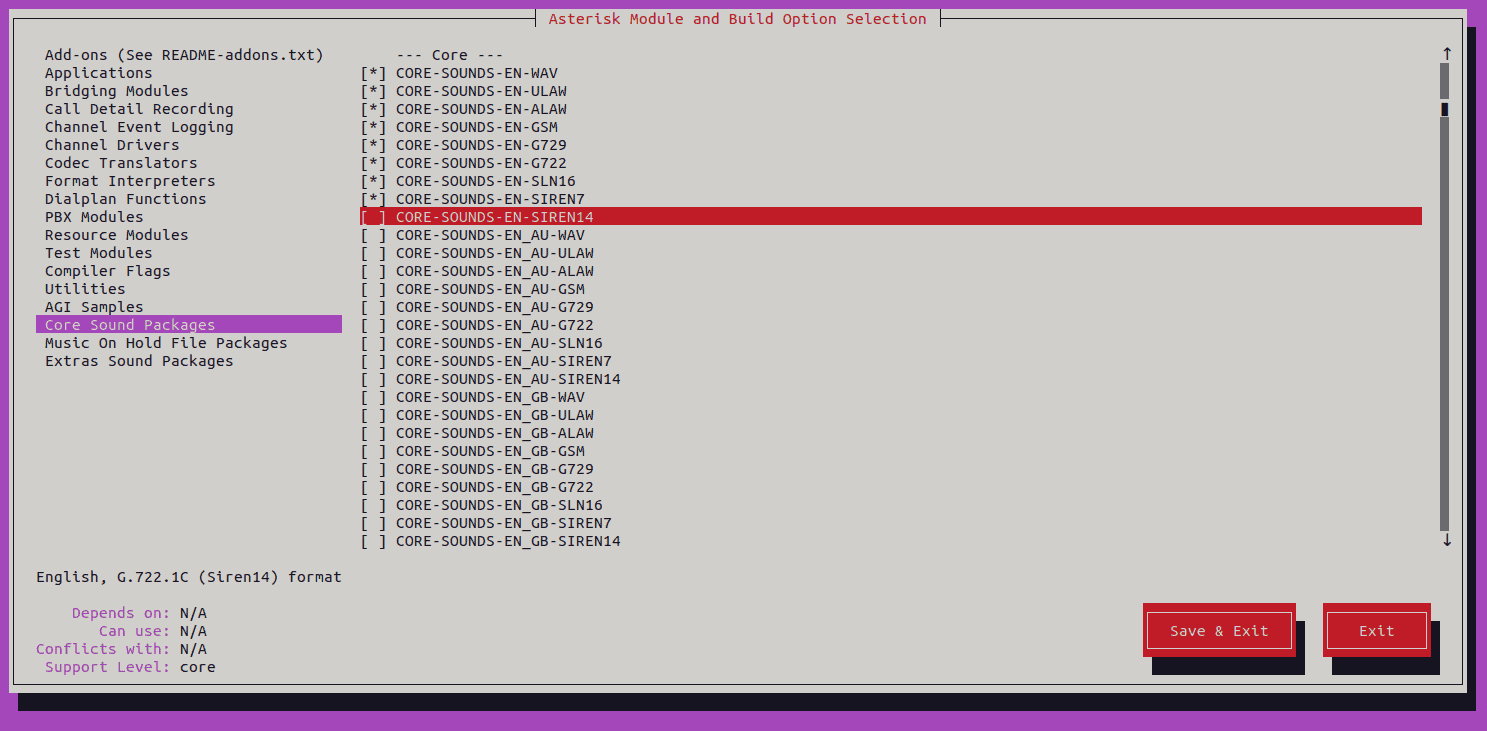
Then, again use the Arrow key to select and enable the music on hold module.
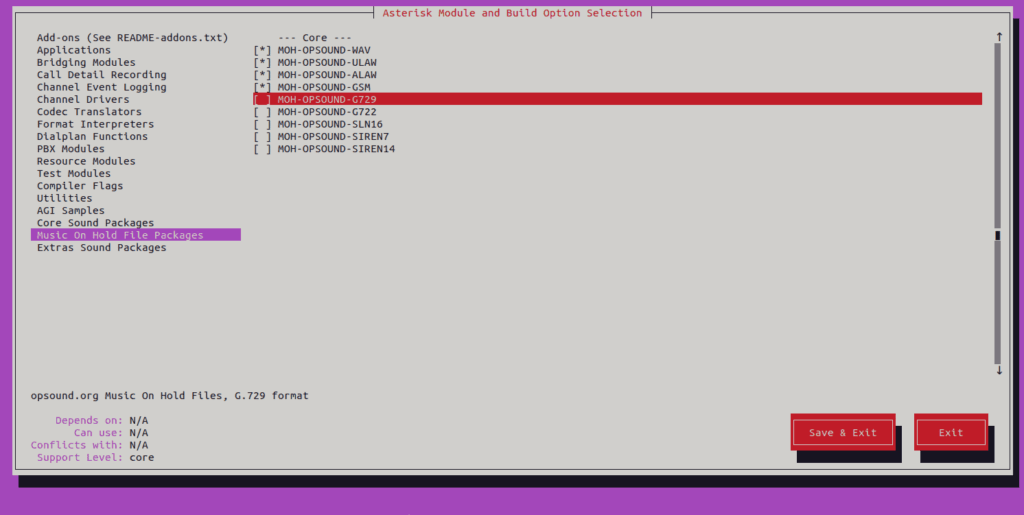
Next, use the Arrow to select and enable the extra sound module as shown below.

Once you are done, click on the Save & Exit button to apply the changes. Then, run the following command to build the Asterisk server.
make -j2Finally, install the Asterisk with the following command.
make installThis installs the Asterisk server on your system as shown below.

You also need to run the following commands to install samples and configuration files.
make samples
make config
ldconfigFirst, create a dedicated user and group for Asterisk using the following command.
groupadd asterisk
useradd -r -d /var/lib/asterisk -g asterisk asterisk
Next, add the Asterisk user to the audio and dial-out group.
usermod -aG audio,dialout asteriskThen, set the required permission on Asterisk directories.
chown -R asterisk:asterisk /etc/asterisk
chown -R asterisk:asterisk /var/{lib,log,spool}/asterisk
chown -R asterisk:asterisk /usr/lib/asterisk
Next, edit the Asterisk configuration file with the following command.
nano /etc/default/asteriskChange the following line to match your Asterisk user and group.
AST_USER="asterisk"
AST_GROUP="asterisk"
Save and close the file then edit the Asterisk main configuration file.
nano /etc/asterisk/asterisk.confChange the following lines.
runuser = asterisk ; The user to run as.
rungroup = asterisk ; The group to run as.
Save and close the file and then restart the Asterisk service to implement the changes.
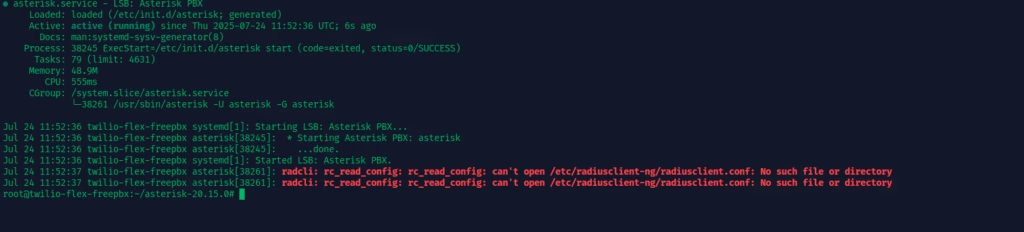
systemctl restart asteriskTo check the Asterisk status, run the following command.
systemctl status asteriskYou should see the following output.
● asterisk.service - LSB: Asterisk PBX
     Loaded: loaded (/etc/init.d/asterisk; generated)
     Active: active (running) since Mon 2023-05-22 08:39:29 UTC; 6s ago
       Docs: man:systemd-sysv-generator(8)
    Process: 52048 ExecStart=/etc/init.d/asterisk start (code=exited, status=0/SUCCESS)
      Tasks: 74 (limit: 4579)
     Memory: 37.4M
        CPU: 989ms
     CGroup: /system.slice/asterisk.service
             └─52064 /usr/sbin/asterisk -U asterisk -G asterisk

May 22 08:39:28 ubuntu2204 systemd[1]: Starting LSB: Asterisk PBX...
May 22 08:39:29 ubuntu2204 asterisk[52048]:  * Starting Asterisk PBX: asterisk
May 22 08:39:29 ubuntu2204 asterisk[52048]:    ...done.
May 22 08:39:29 ubuntu2204 systemd[1]: Started LSB: Asterisk PBX.
At this point, the Asterisk server is installed and configured on your server. Now, it’s time to verify it. Run the following command to connect to the Asterisk console.
asterisk -rvvIf everything is fine, you will get into the Asterisk console as shown below.

Run the following command to exit from the Asterisk console.
exitNext, you need to install Apache, MariaDB, and PHP on your server. First, add the PHP repository with the following command.
apt install software-properties-common
add-apt-repository ppa:ondrej/php
Then, install the Apache, MariaDB, PHP, and other required packages with the following command.
apt install apache2 mariadb-server libapache2-mod-php7.4 php7.4 php-pear php7.4-cgi php7.4-common php7.4-curl php7.4-mbstring php7.4-gd php7.4-mysql php7.4-bcmath php7.4-zip php7.4-xml php7.4-imap php7.4-json php7.4-snmpOnce all the packages are installed, start and enable the Apache and MariaDB services using the following command.
systemctl start apache2 mariadb
systemctl enable apache2 mariadbcd ~First, visit the FreePBX official website, pick the latest version of FreePBX then download it using the wget command as shown below.
wget http://mirror.freepbx.org/modules/packages/freepbx/freepbx-16.0-latest.tgzOnce the FreePBX is downloaded, extract it using the following command.
tar -xvzf freepbx-16.0-latest.tgzNext, navigate to the extracted directory and install Node.js, and NPM with the following command.
cd freepbx
apt-get install nodejs npm -y
Then, run the following command to set the required permissions.
./install -n./install -n
PHP Fatal error: Uncaught Error: Call to undefined function FreePBX\Install\simplexml_load_file() in /root/freepbx/install:19
Stack trace:
#0 {main}
thrown in /root/freepbx/install on line 19Run
sudo ln -sf /usr/bin/php7.4 /usr/bin/phpand again the above command
./install -nAfter that, install the PM2 module with the following command.
fwconsole ma install pm2Next, change the Apache configuration file with the following command.
sed -i 's/^\(User\|Group\).*/\1 asterisk/' /etc/apache2/apache2.conf
sed -i 's/AllowOverride None/AllowOverride All/' /etc/apache2/apache2.conf
Then, set the max upload file size limit in PHP with the following command.
sed -i 's/\(^upload_max_filesize = \).*/\120M/' /etc/php/7.4/apache2/php.ini
sed -i 's/\(^upload_max_filesize = \).*/\120M/' /etc/php/7.4/cli/php.ini
Next, enable the Apache rewrite module using the following command.
a2enmod rewriteFinally, restart the Apache service to implement the configuration changes.
systemctl restart apache2At this point, FreePBX is installed and configured on your server. Now, open your web browser and access the FreePBX web interface using the URL http://freepbx-server-ip/admin. See the FreePBX initial setup screen.

Define your username, password, email, and other configuration then click on the Setup System. See the following screen.

Click on the FreePBX Administration. You are redirected to the FreePBX login screen:
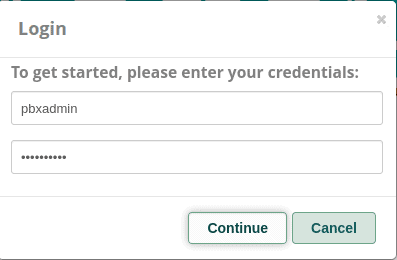
Type your administrator username, and password then click Continue. After the successful login, you should see the FreePBX dashboard on the following screen.

Unable to locate the FreePBX BMO Class ‘Core’A required module might be disabled or uninstalled. Recommended steps (run from the CLI): 1) fwconsole ma install core 2) fwconsole ma enable core
Run the following command to solve the above error:
fwconsole ma install core 2 -fGo to http:yourserverip/admin/config.php Select CTRL + A, and you will find a session ID like 3oove3b41u5gs3q538mpkknjaj(will be different for you) select this and SSH to the server and run
fwconsole unlock session-idNote: Replace <session-id> with your own session id
To Resolve this issue, follow the steps below
nano /etc/asterisk/cdr.confAdd the following line at the end of the [radius] section
radiuscfg => /etc/radcli/radiusclient.conf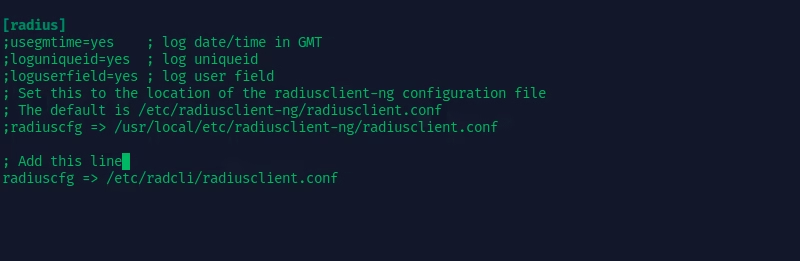
This also needs to be done for the file /etc/asterisk/cel.conf
nano /etc/asterisk/cel.confAdd the following line at the end of the [radius] section.
radiuscfg => /etc/radcli/radiusclient.conf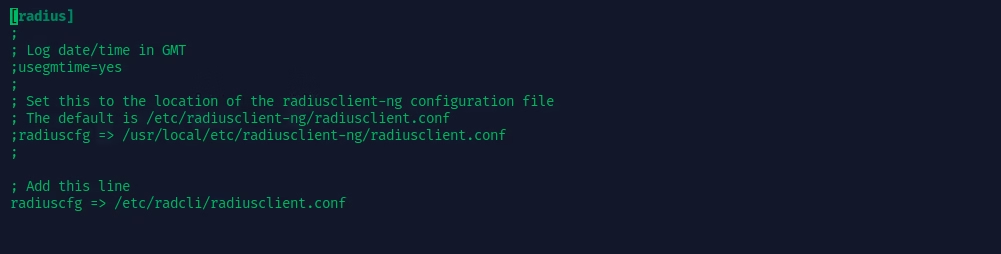
After the above steps run
systemctl restart asterisk
systemctl status asteriskIn this post, we learned how to install FreePBX and Asterisk PBX on Ubuntu 22.04/23.04.


Have you ever thought about including a little bit more than just your articles?
I mean, what you say is fundamental and all. Nevertgheless imagine if you added some great photos or video clips to
give your posts more, “pop”! Your content is excellent
but with images and videos, this website could undeniably be one of the greatest
in its niche. Great blog!
Howdy! This blog post could not be written much better!
Looking through this ppost reminds me of my previous roommate!
He always keplt talking about this. I am going to send this post to him.
Fairly certain he will have a great read. Thanks ffor sharing!
I congratulate, the remarkable message
Good
Hi