Physical Address
304 North Cardinal St.
Dorchester Center, MA 02124
Physical Address
304 North Cardinal St.
Dorchester Center, MA 02124


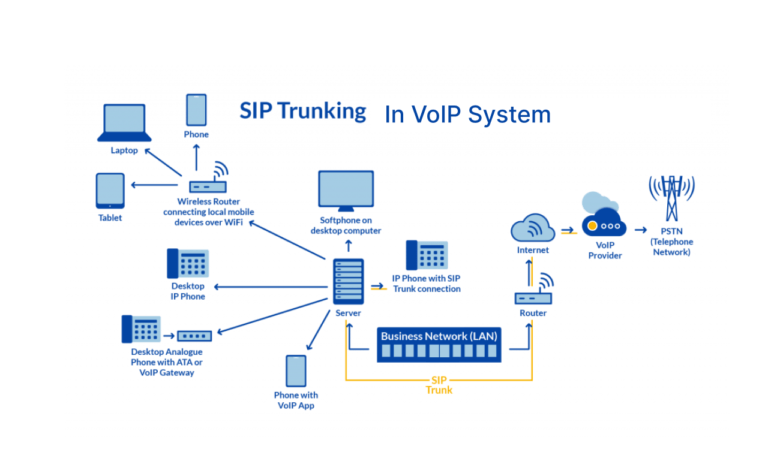
FreeSwitch Installation on Debian 11/12.
FreeSWITCH is a free and open-source telephony software for real-time communication protocols using audio, video, text, and other forms of media. The software has applications in Web Real-Time Communication (WebRTC), voice over Internet Protocol (VoIP), video transcoding, and Multipoint Control Unit (MCU) functionality. It supports Session Initiation Protocol (SIP) and Real-time Transport Protocol (RTP) features.
First announced in January 2006, the FreeSWITCH project officially released its first version in May 2008. The following iterations—1.2, 1.3, and 1.4—supported SIP over Websocket and WebRTC and were published in 2012 and 2014. 2018 saw the release of the 1.8 version, which added capabilities for video transcoding and video conferencing to the 1.6 version. The most recent version is 1.10.
To offer elastic FreeSWITCH core-based cloud telecommunication services and act as a long-term commercial sponsor for the FreeSWITCH open-source project, SignalWire Inc. was established in 2018. After that, it bought FreeSWITCH Solutions.
Here is a list of applications and projects built with or utilizing FreeSWITCH:
Let’s start the installation guide!
First, you have to obtain a FreeSWITCH Personal Access Token from SignalWire, follow the below steps to get one.


Personal Access Tokens
Add New Button
Generate button
personal access token somewhere safe as you won’t be able to retrieve it again after the tab is closed.
After Obtaining the Personal Access Token Follow The Below Steps.
sudo suEnter the password, if asked
cdcd command is used to change the directory
use the following code to set the TOKEN variable to the value of the personal access token you got from Signalwire.
TOKEN=YOURSIGNALWIRETOKENapt-get update && apt-get install -yq gnupg2 wget lsb-releasewget --http-user=signalwire --http-password=$TOKEN -O /usr/share/keyrings/signalwire-freeswitch-repo.gpg https://freeswitch.signalwire.com/repo/deb/debian-release/signalwire-freeswitch-repo.gpgYou will get an output like this:

On the first try, it throws 401 UnAuthorized Error, because it does not know us, after that it responds with 200 OK which means, we are successfully authenticated and it downloads the FreeSWITCH repo.
echo "machine freeswitch.signalwire.com login signalwire password $TOKEN" > /etc/apt/auth.confchmod 600 /etc/apt/auth.conf600 permissions means that only the file owner has full read and write access to it. Once a file permission is set to 600, no one else can access the file
echo "deb [signed-by=/usr/share/keyrings/signalwire-freeswitch-repo.gpg] https://freeswitch.signalwire.com/repo/deb/debian-release/ `lsb_release -sc` main" > /etc/apt/sources.list.d/freeswitch.listfreeswitch.list in the /etc/apt/sources.list.d/ directory.echo "deb-src [signed-by=/usr/share/keyrings/signalwire-freeswitch-repo.gpg] https://freeswitch.signalwire.com/repo/deb/debian-release/ `lsb_release -sc` main" >> /etc/apt/sources.list.d/freeswitch.listfreeswitch.list file in the /etc/apt/sources.list.d/ directory.apt-get update# Install dependencies required for the FreeSwitch build
apt-get build-dep freeswitchThis will prompt you to continue the installation of FreeSwitch, enter y to continue installation

# then get the source. Use the -b flag to get a specific branch
cd /usr/src/
git clone https://github.com/signalwire/freeswitch.git -bv1.10 freeswitch
cd freeswitchgit config pull.rebase true./bootstrap.sh -j
./configure
make
make installFor Linux operating systems, systemd is a software suite that offers a variety of system components. The primary goal is to standardize behaviour and configuration for services across Linux distributions. An init system called “system and service manager” serves as its main part and is used to control user processes and bootstrap user space.
use nano or any other editor you want to use to create /etc/systemd/system/freeswitch.service. I will be using nano.
[Service]
; service
Type=forking
PIDFile=/usr/local/freeswitch/run/freeswitch.pid
PermissionsStartOnly=true
ExecStartPre=/bin/mkdir -p /usr/local/freeswitch/run
ExecStartPre=/bin/chown freeswitch:daemon /usr/local/freeswitch/run
ExecStart=/usr/local/freeswitch/bin/freeswitch -ncwait -nonat
TimeoutSec=45s
Restart=always
; exec
WorkingDirectory=/usr/local/freeswitch/run
User=freeswitch
Group=daemon
LimitCORE=infinity
LimitNOFILE=100000
LimitNPROC=60000
;LimitSTACK=240
LimitRTPRIO=infinity
LimitRTTIME=7000000
IOSchedulingClass=realtime
IOSchedulingPriority=2
CPUSchedulingPolicy=rr
CPUSchedulingPriority=89
UMask=0007

[Install]
WantedBy=multi-user.target
enable and start the freeswitch service
systemctl daemon-reload
systemctl start freeswitch
systemctl enable freeswitch
check if the freeswitch service is running
ps aux | grep freeswitchYou will get something like this.
nano ~/.bash_profilePATH=$PATH:$HOME/bin
PATH=$PATH:/usr/local/freeswitch/bin
export PATH
unset USernameAnd there you have it. We installed Freeswitch.
Check whether freeswitch cli is working
cd /usr/local/freeswitch/bin/Run ./fs_cli
./fs_cliYou will get something like this, which means, our FreeSWITCH installation was successful.

In this post, we learned how to install Freeswitch on Debian 11/12.


I was reading some of your content on this site and I believe this website is really instructive!
Retain posting.
Glad to know, you found it helpful.
Is this the method for installing FreeSWITCH from source?
yes
Is this the method for installing FreeSWITCH from source?
yes
Your site visitors, especially me appreciate the time and effort you have spent to put this information together.