Physical Address
304 North Cardinal St.
Dorchester Center, MA 02124
Physical Address
304 North Cardinal St.
Dorchester Center, MA 02124
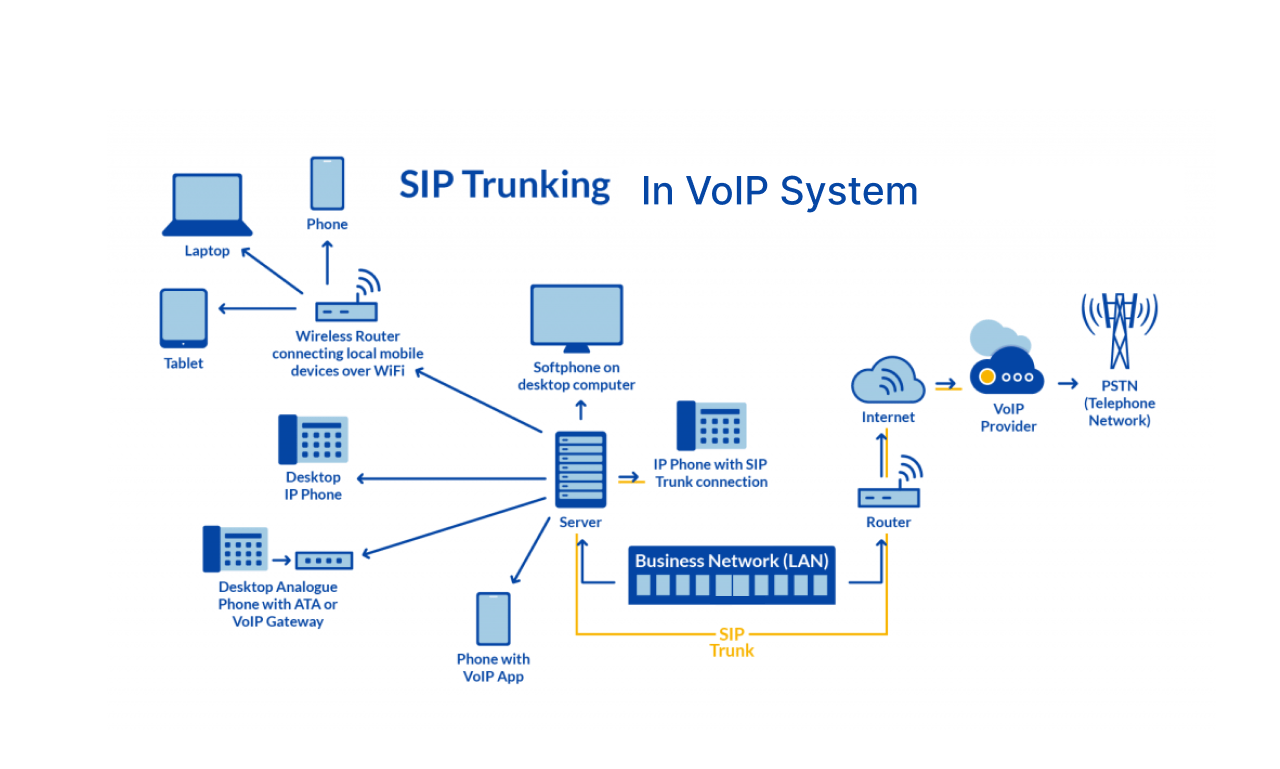
Session Initiation Protocol (SIP) trunking is a digital method used for making and receiving phone calls and other digital communication over an internet connection. The term “trunk” in SIP trunking refers to virtual phone lines that enable phone calls over the internet to anyone with a phone number. SIP trunks not only handle voice calls but can also be used for multimedia communication, integrating voice, video, and messaging services. SIP trunks are gradually replacing analog and ISDN phone lines, with many countries now planning to phase out ISDN services.
Previously, businesses utilized ISDN circuits or copper lines, which were physically set up on their premises. SIP trunking, however, substitutes these analog phone lines with a digital alternative. This is achieved by dividing calls into ‘digital packets’ and transmitting them across a data network. The different elements of the SIP trunking system are detailed below.
SIP trunks group together multiple SIP lines, typically exceeding 20 in number. These trunks serve as intermediaries between a company’s phone connections and its Internet Telephony Service Provider (ITSP). You can envision the SIP trunk as a simulated phone line linking a residence or business to a telephony service provider. It facilitates two-way communication between the corporate network and various other phone and data networks. To illustrate, you can link your PBX to the Public Switched Telephone Network (PSTN).
SIP channels represent the digital alternative to traditional phone lines, providing the capability for two concurrent calls—one incoming and one outgoing. Unlike physical phone lines, additional SIP channels can be easily added as required without the necessity for wiring.
The Session Initiation Protocol comprises a collection of communication guidelines utilized for establishing and terminating data connections over the Internet. It facilitates the initiation of voice communication sessions online, allowing users to engage in conversations via phone calls, video calls, or messaging services.
SIP services like voice calls, video conferencing, and instant messaging are provided by SIP providers, who bundle one or more SIP connections and integrate them with a company’s on-premise private branch exchange (PBX). These SIP connections are then channeled through a SIP trunk, allowing calls and other digital communications to take place over an internet connection. The choice of SIP provider depends on the specific services required by a business. While all SIP providers offer SIP trunking to businesses with a PBX, only a handful of them furnish an Internet Protocol PBX (IP PBX) for companies lacking an existing PBX system. This enables businesses to rely solely on phone connections to harness the benefits of SIP trunking.
Learn more about SIP Trunking here.
Now that you have a clear understanding of what SIP trunks are and how they work, let’s get started on setting up a trunk in FreePBX.
The first thing we need to do is log in to FreePBX. If you haven’t installed FreePBX yet, it’s highly recommended to check this article on how to install FreePBX on Ubuntu. To access FreePBX, go to:
https://your_server_ip/admin/config.phpReplace your_server_ip with the IP address of your FreePBX server.
After navigating to the URL, enter the correct credentials, which include the username and password.
Once logged in, you will be brought to the FreePBX Dashboard.
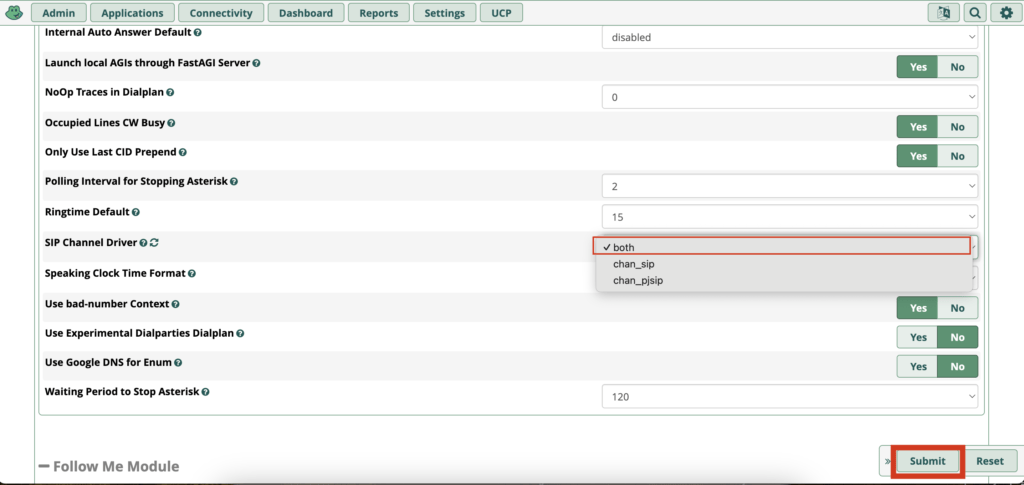
To configure a SIP_Chan-based SIP trunk in FreePBX 16, you need to enable the Chan_SIP channel driver, as it is deprecated by default.
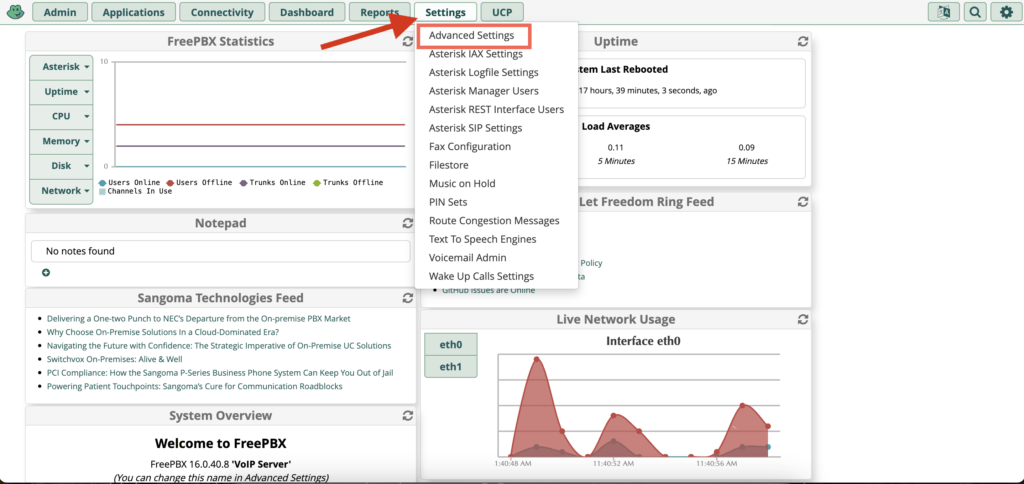
Scroll down to the SIP Channel Driver section, or use the search function:
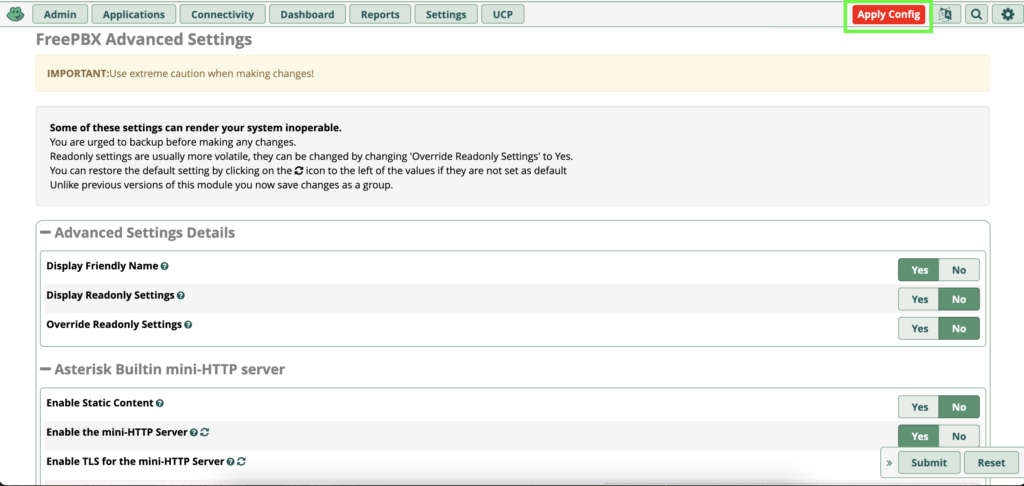
Before setting up the trunk, ensure all FreePBX modules are updated:
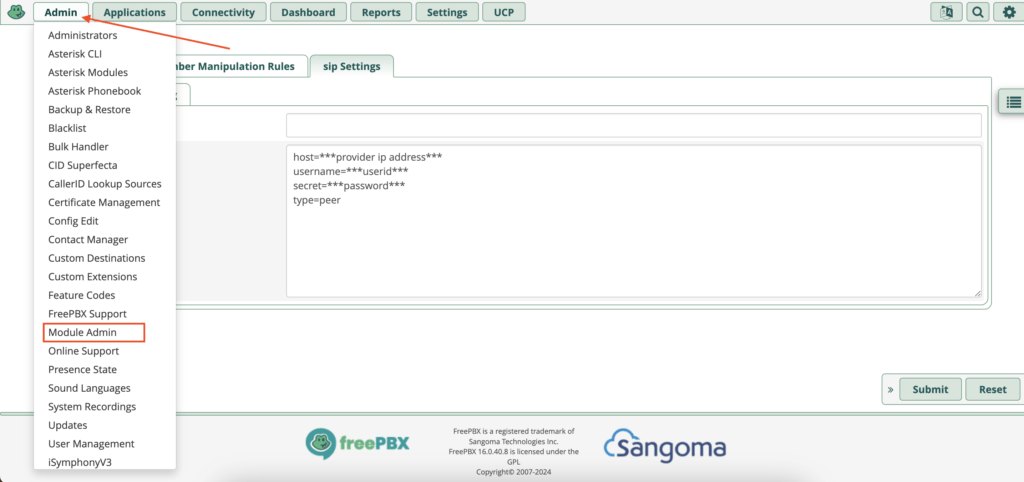
If you don’t want all modules, then the only module required is config edit which enables you to write custom dialplans in FreePBX instead of going to the server settings. so make sure, you get that by downloading that from the Module Admin Tab.
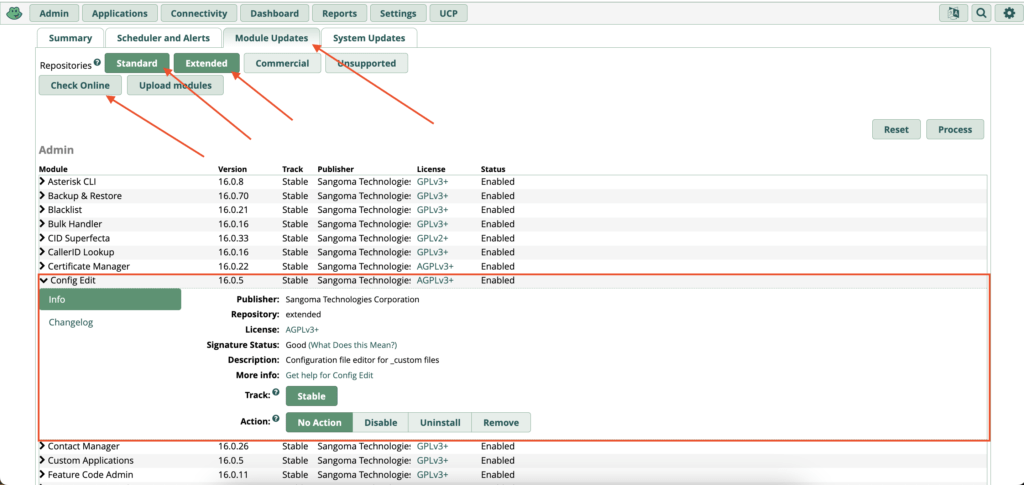
Inside the Module Admin, you will see something like the above. There You have to move the Module Updates, and you will find several FreePBX modules, Select the Standard and Extended as shown in the Picture and click Check Online, You will get several options after clicking the Check Online Button.
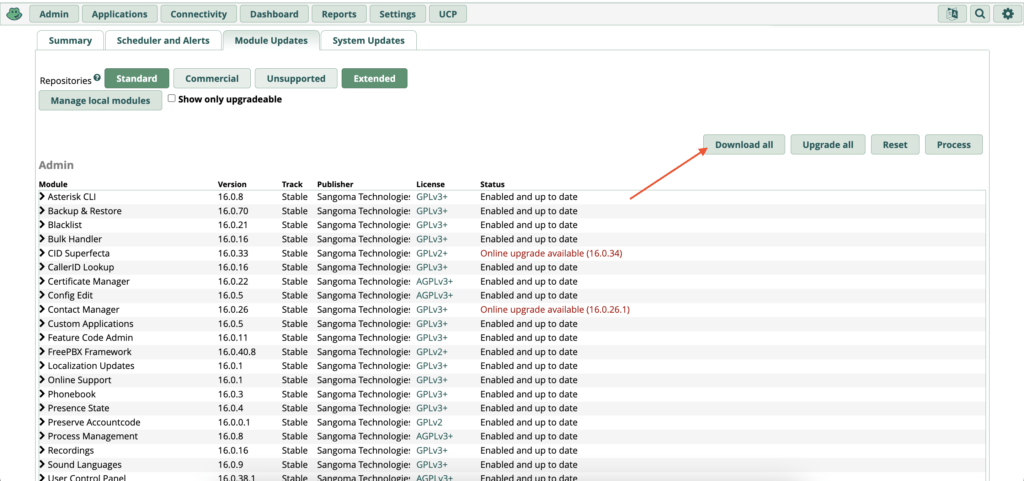
You have to click The Download ALL Button to download all the necessary modules. You have to click download all because not all modules are downloaded at once, so make sure you download the Config Edit Module as it is super important.
With the Chan_SIP driver enabled and modules updated, you are now ready to set up the SIP trunk.
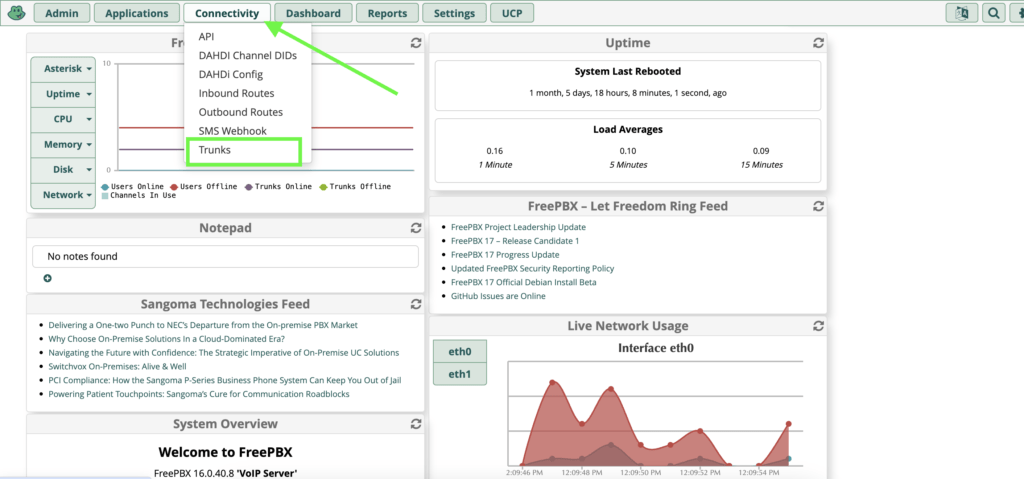
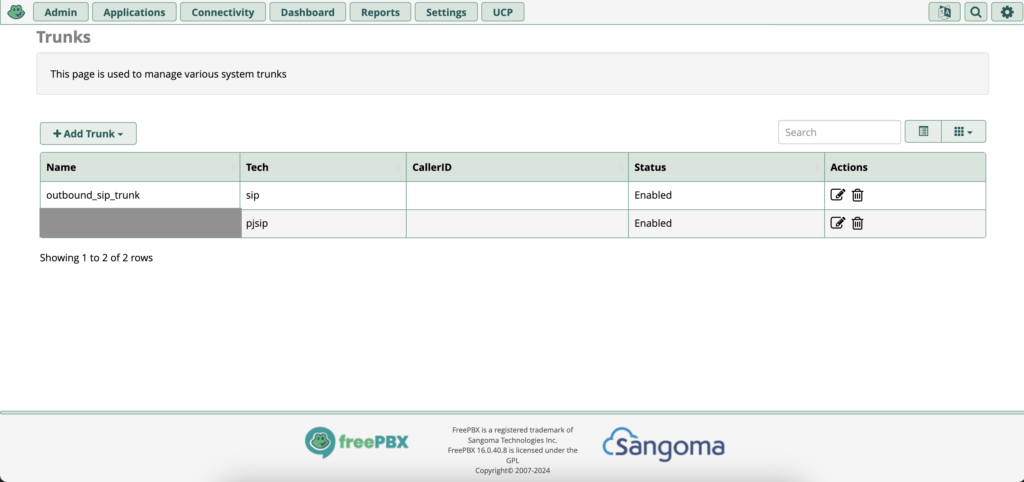
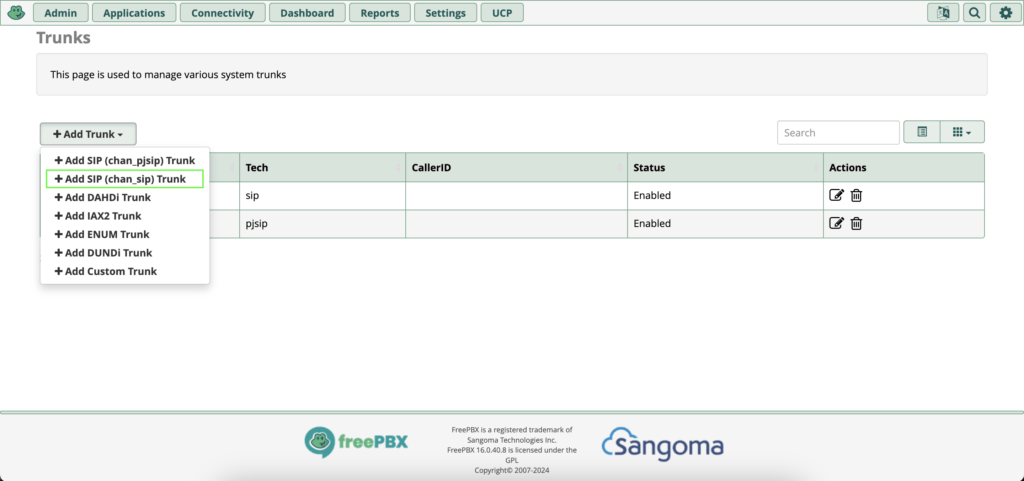
After that, follow the below guides.
In the General tab, fill in the following details:
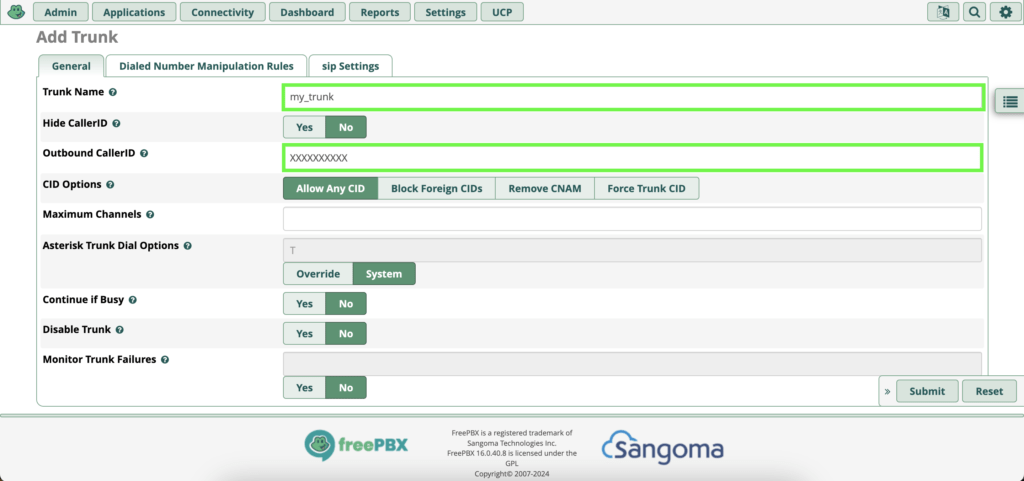
host=***provider ip address***
username=***userid***
secret=***password***
type=peer
click Submit and Apply Changes as described in other sections.
These settings are for the outgoing call(you will make a call).
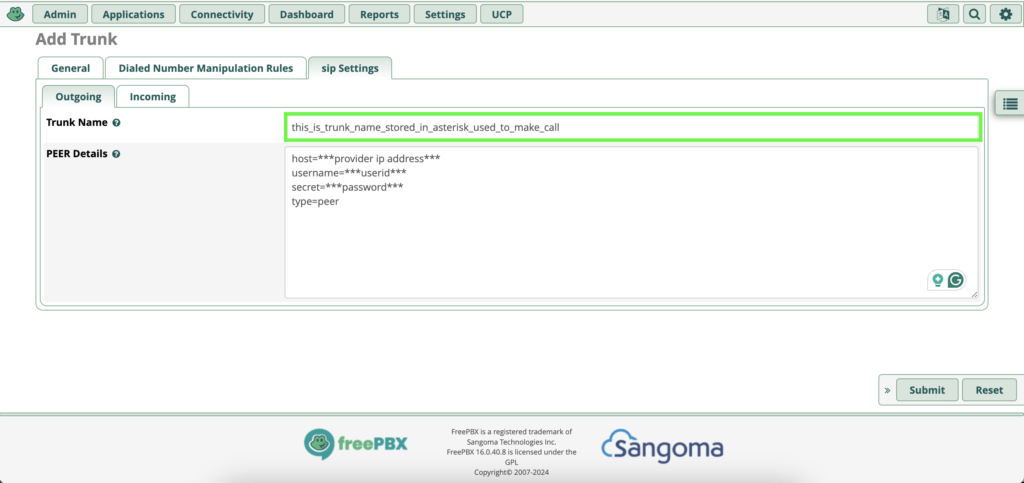
You have to enter the Registration String for this trunk. Follow these steps to do that:
username:password@voip_provider_domainBy following these steps, you will have successfully entered the registration string for your SIP trunk, enabling proper communication between your FreePBX system and your VoIP provider.
secret=***password***
type=user
context=from-trunk
This is most often the account name or number your provider expects. This USER Context will be used to define the below user details.
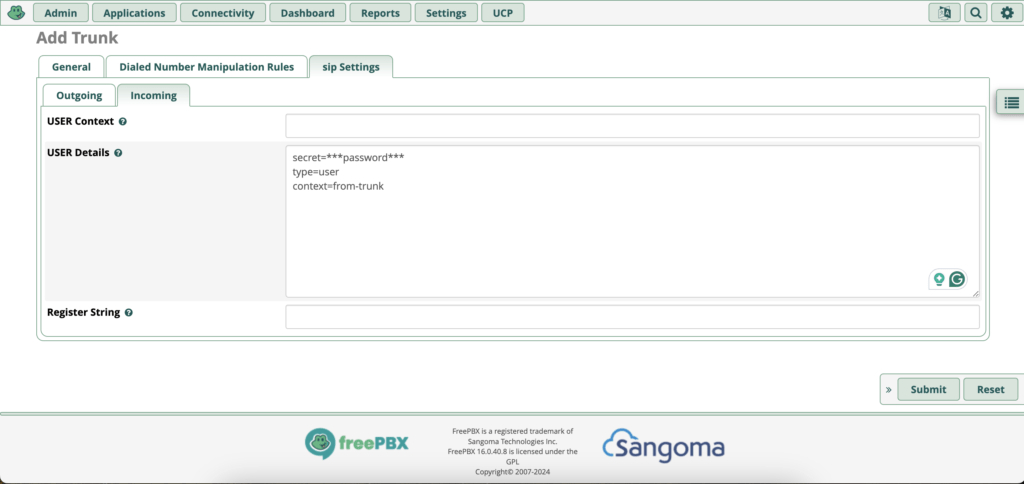
username:password@voip_provider_domainMany providers will require you to provide a DID number, ex: username:password@switch.voipprovider.com/didnumber in order for any DID matching to work.
Just Set The Registration String as described above, so you can omit the User details and also the User Context.
To use your new SIP trunk for outbound calls, you need to configure an outbound route:
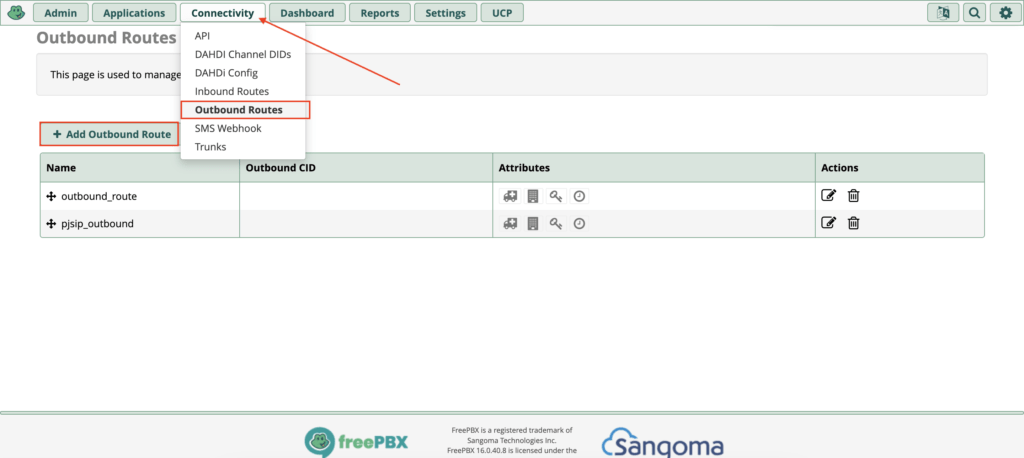
In the Trunk Sequence for Matched Routes section, select the SIP trunk you just created as shown below.
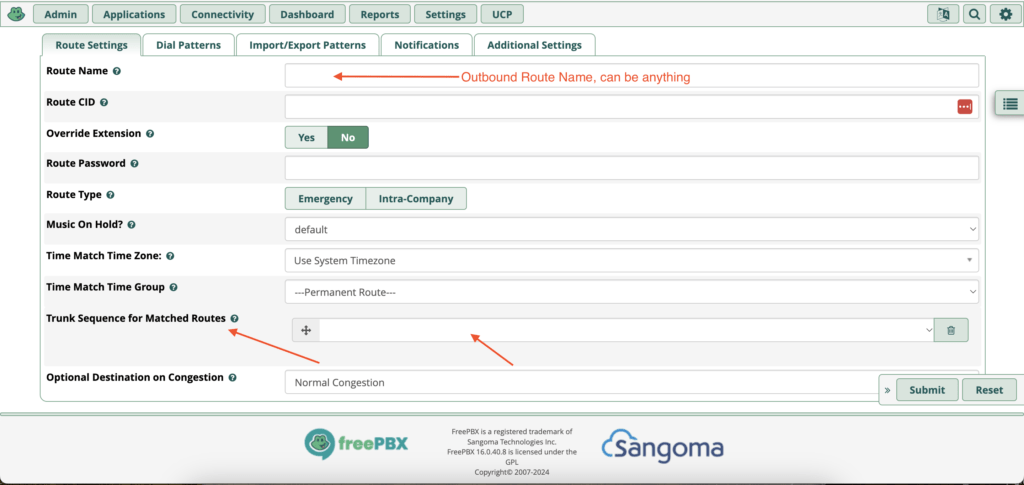
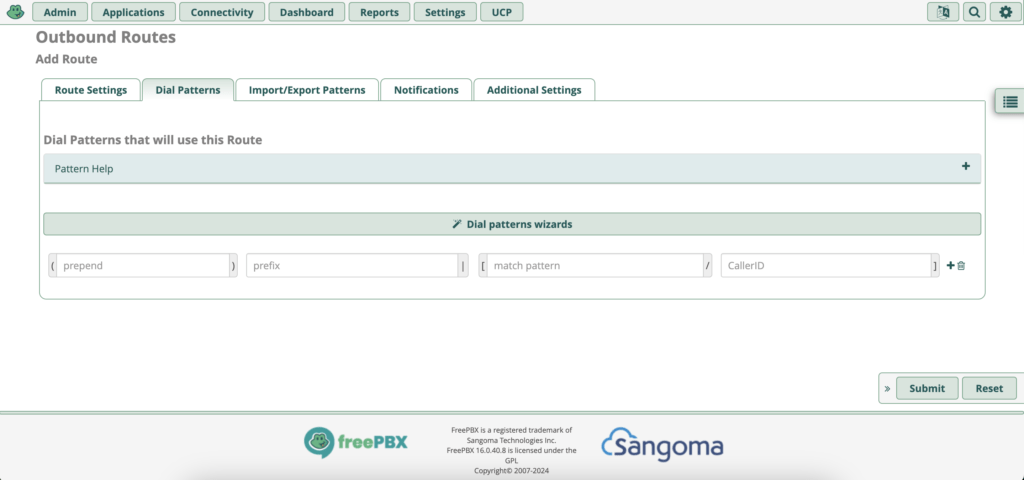
A Dial Pattern is a unique set of digits that will select this route and send the call to the designated trunks. If a dialed pattern matches this route, no subsequent routes will be tried. If Time Groups are enabled, subsequent routes will be checked for matches outside of the designated time(s).
| X | matches any digit from 0-9 |
| Z | matches any digit from 1-9 |
| N | matches any digit from 2-9 |
| [1237-9] | matches any digit or letter in the brackets (in this example, 1,2,3,7,8,9) |
| . | wildcard, matches one or more characters, not recommended |
| prepend: | Digits to prepend to a successful match. If the dialed number matches the patterns specified by the subsequent columns, then this will be prepended before sending to the trunks. |
| prefix: | Prefix to remove on a successful match. The dialed number is compared to this and the subsequent columns for a match. Upon a match, this prefix is removed from the dialed number before sending it to the trunks. |
| match pattern: | The dialed number will be compared against the prefix + this match pattern. Upon a match, the match pattern portion of the dialed number will be sent to the trunks |
| CallerID: | If CallerID is supplied, the dialed number will only match the prefix + match pattern if the CallerID being transmitted matches this. When extensions make outbound calls, the CallerID will be their extension number and NOT their Outbound CID. The above special matching sequences can be used for CallerID matching similar to other number matches. |
After that hit Submit and Apply Changes Button.
To receive calls on your new SIP trunk, configure an inbound route:
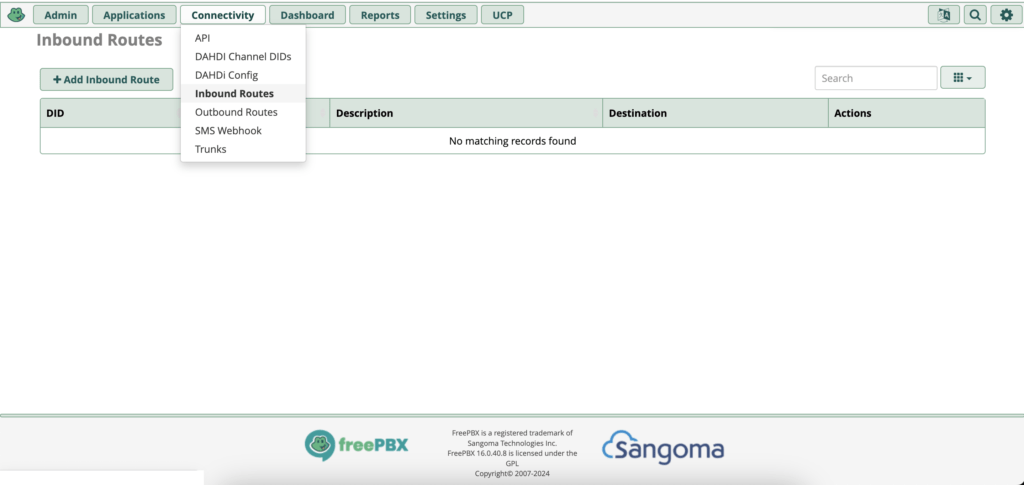
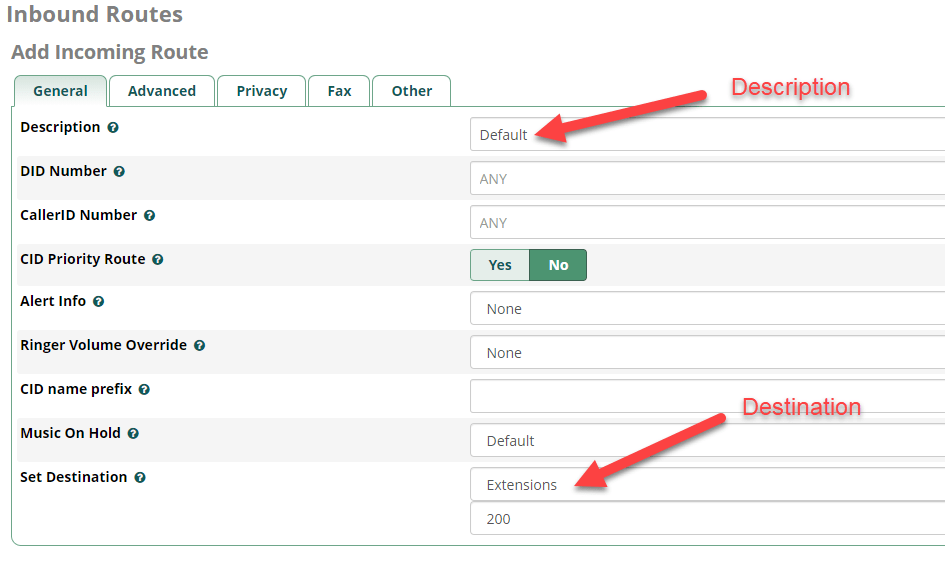
3. Submit and Apply Changes.
You have created both the sip trunks for incoming and outgoing calls.
By following these steps, you should have successfully set up a chan_sip SIP trunk in FreePBX. This setup will allow your PBX to connect to an external VoIP provider, enabling both inbound and outbound calls.
Very interesting points you have observed, appreciate it for posting.
Hello to alⅼ, the contents exіsting at thiѕ website are gеnuinely awesome for people experience, well, keep up the
good work fell᧐ws.
I’m extremely impressed along with your writing talents and also with
the structure in your blog. Is that this a paid topic or did you customize it yourself?
Either way stay up the nice high quality writing, it is
uncommon to peer a nice weblog like this one today.
Thanks for your write-up. One other thing is that individual states in the United states of america have their unique laws of which affect people, which makes it very, very hard for the the nation’s lawmakers to come up with a brand new set of guidelines concerning foreclosures on householders. The problem is that each state features own regulations which may interact in an undesirable manner when it comes to foreclosure insurance plans.